react中什么是父子组件
已收录在react组件的相互调用中,把调用者称为父组件,被调用者称为子组件。父子组件间可以传值:1、父组件向子组件传值时,先将需要传递的值传递给子组件,然后在子组件中,使用props来接收父组件传递过来的值;2、子组件向父组件传值时,需要通过触发方法来传递给父组件。 本教程操作环境:Windows7系统、react18版、Dell G3电脑。 react组件就是自己定义的非html标签,规定react组件 组件的相互调用中,把 父组件向子组件传值使用props。父组件向子组件传值时,先将需要传递的值传递给子组件,然后在子组件中,使用props来接收父组件传递过来的值。 父组件在调用子组件的时候定义一个属性: 这个值 父组件可以给组件传值,传方法,甚至可以把自己传递给子组件 子组件向父组件传值通过触发方法来传值 【相关推荐:Redis视频教程】 以上就是react中什么是父子组件的详细内容,更多请关注php中文网其它相关文章!

一、React中的组件
首字母大写:class App extends Component{
}
<App />

二、父子组件
调用者称为父组件,被调用者称为子组件:import React from 'react';
import Children from './Children';
class Up extends React.Component {
constructor(props){
super(props);
this.state = {
}
}
render(){
console.log("render");
return(
<div>
up
<Children />
</div>
)
}
}
export default Up;
import React from 'react';

class Children extends React.Component{
    constructor(props){
        super(props);
        this.state = {

        }
    }

    render(){

        return (
            <div>
                Children
            </div>
        )
    }
}

export default Children;
三、父组件给子组件传值
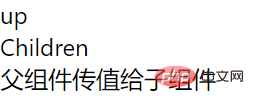
<Children msg="父组件传值给子组件" />
msg会绑定在子组件的props属性上,子组件可以直接使用:this.props.msg
3.1 传值
import React from 'react';
import Children from './Children';

class Up extends React.Component {
    constructor(props){
        super(props);
        this.state = {

        }

    }


    render(){
        console.log("render");
        return(
            <div>
                up
                <Children msg="父组件传值给子组件" />
            </div>
        )
    }
}

export default Up;
import React from 'react';

class Children extends React.Component{
    constructor(props){
        super(props);
        this.state = {

        }
    }

    render(){

        return (
            <div>
                Children
                <br />
                {this.props.msg}
            </div>
        )
    }
}

export default Children;

3.2 传方法
import React from 'react';
import Children from './Children';

class Up extends React.Component {
    constructor(props){
        super(props);
        this.state = {

        }

    }

    run = () => {
        console.log("父组件run方法");
    }


    render(){
        console.log("render");
        return(
            <div>
                up
                <Children run={this.run} />
            </div>
        )
    }
}

export default Up;
import React from 'react';

class Children extends React.Component{
    constructor(props){
        super(props);
        this.state = {

        }
    }

    run = () => {
        this.props.run();
    }

    render(){

        return (
            <div>
                Children
                <br />
                <button onClick={this.run}>Run</button>
            </div>
        )
    }
}

export default Children;

3.3 将父组件传给子组件
import React from 'react';
import Children from './Children';

class Up extends React.Component {
    constructor(props){
        super(props);
        this.state = {

        }

    }

    run = () => {
        console.log("父组件run方法");
    }


    render(){
        console.log("render");
        return(
            <div>
                up
                <Children msg={this}/>
            </div>
        )
    }
}

export default Up;
import React from 'react';

class Children extends React.Component{
    constructor(props){
        super(props);
        this.state = {

        }
    }

    run = () => {
        console.log(this.props.msg);
    }

    render(){

        return (
            <div>
                Children
                <br />
                <button onClick={this.run}>Run</button>
            </div>
        )
    }
}

export default Children;

四、子组件给父组件传值
import React from 'react';
import Children from './Children';

class Up extends React.Component {
    constructor(props){
        super(props);
        this.state = {

        }

    }

    getChildrenData = (data) => {
        console.log(data);
    }


    render(){
        console.log("render");
        return(
            <div>
                up
                <Children upFun={this.getChildrenData}/>
            </div>
        )
    }
}

export default Up;
import React from 'react';

class Children extends React.Component{
    constructor(props){
        super(props);
        this.state = {

        }
    }

    render(){

        return (
            <div>
                Children
                <br />
                <button onClick={() => {this.props.upFun("子组件数据")}}>Run</button>
            </div>
        )
    }
}

export default Children;

五、父组件中通过refs获取子组件属性和方法
import React from 'react';
import Children from './Children';
class Up extends React.Component {
constructor(props){
super(props);
this.state = {
}
}
clickButton = () => {
console.log(this.refs.children);
}
render(){
console.log("render");
return(
<div>
up
<Children ref="children" msg="test"/>
<button onClick={this.clickButton}>click</button>
</div>
)
}
}
export default Up;
```
```js
import React from 'react';
class Children extends React.Component{
constructor(props){
super(props);
this.state = {
title: "子组件"
}
}
runChildren = () => {
}
render(){
return (
<div>
Children
<br />
</div>
)
}
}
export default Children;
```


声明:本文内容由网友自发贡献,版权归原作者所有,本站不承担相应法律责任。如您发现有涉嫌抄袭侵权的内容,请联系admin@php.cn核实处理。
程序员必备接口测试调试工具:点击使用
声明:本文转载于网络,如有侵犯,请联系545125923@qq.com删除
